Plastics have a wide application to the products that many of us use every day. Plastics, when compared to materials like metals and wood, tend to be cheaper, lighter, are easier to mold, and can be made into whatever size they need to be. One of the main drawbacks of plastics, however, is that it can have low rigidity when compared to more robust materials. In this article, we'll discuss the uses of rib design to help to increase the rigidity of the material.
One Way to Increase Rigidity
Due to it's low inherent rigidity, the use cases for plastics can be limited. There are a couple of ways to solve this issue. First, you can increase the thickness of the plastic parts. This option can be quite limited in that it has the effect increasing the difficulty of the mold while also negating some of the other advantages that were mentioned earlier, such as lower cost and lighter weight.
A second option is to use a design technique called ribbing. By reinforcing some of the sections of a part with connecting ribs, the part can have increased rigidity while keeping the weight and cost low. There are some techniques that are required to pull this off, so we'll discuss those below.
THE Techniques OF RIB DESIGN
Several different attributes are taken into account when designing connecting ribs. These are, for example, the shape, thickness, and height of the rib. We also need to take into account how easily a mold can be created with these ribs included in the design.
Technique 1 : Rectangular Ribs
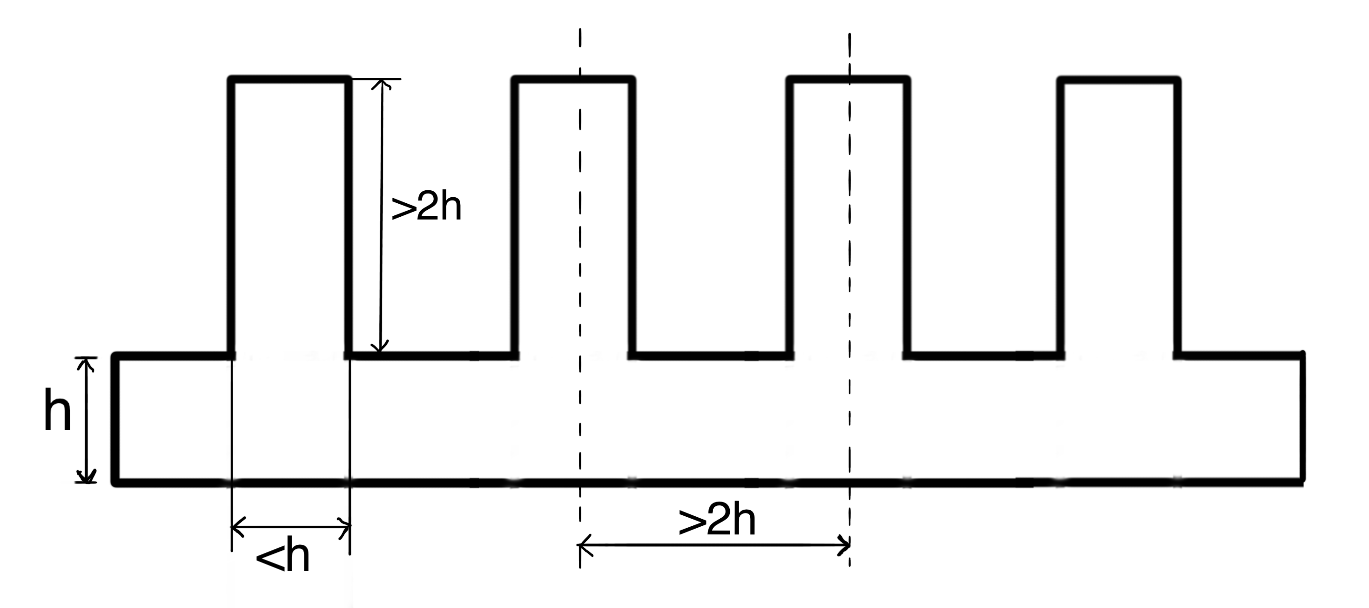
The easiest and most straightforward shape is rectangular solid ribs protruding at a perpendicular angle from the part to be reinforced. Note that, as in the picture below, that the distance between the ribs needs to be larger than 2 times the thickness of the rib. The rib must also be thinner than the thickness of the part being reinforced.
Technique 2:
Even though the rectangular ribs are simple, they might not be the best for manufacturing. The technique below adds a taper to the rib to make the manufacture of the structure better. The structure and limitations of the rib size are noted in the picture below. In words, the angle of the rib wall should be greater than 1 degree with a circular bead on the tip to reduce stress concentration during injection. Be cautious of vesicles in plastics with this design.

Technique 3:
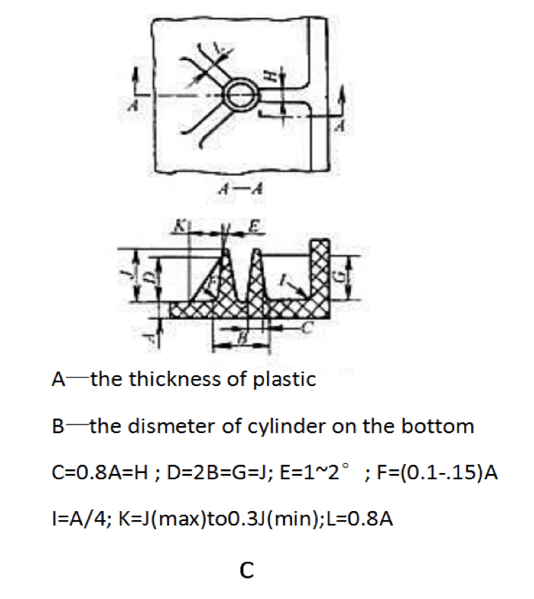
Another optimization is to attach ribs to between a supporting cylinder and the main body of the plastic (as in the diagram below). The cylindrical part will have more strength with the ribs. Generally 3 or 4 ribs are added for rigidity. The diagram also shows the relationships between the ribs and the thickness of the surrounding plastics. There is an important point to note that the height of the rib must be less than the height of the cylinder because, typically, the top surface of the cylinder will be an attachment point or part of the reference plane when multiple parts are assembled.
These are just a few techniques where ribs can help to add strength to a plastic part. There are many others. If you're looking for help with adding plastics to your electronics project, please reach ousut to us and we'll be happy to see how NexPCB can help you!
.png)
.png)
.png)
.png)