To design your IoT device, you should configure the input/output system, data processing types, network configuration, and components to be used. Your choice of components should include specific sensors, circuit boards, connectors, and other peripherals like antennas.

Along with all these things to be considered, there’s another extra detail to be paid attention to: casings.
Dealing with electronics often requires extra care. Circuits should be protected from water to prevent short circuits, air to prevent oxidation and corrosion, and other external factors that could be damaging to the system.
Casings are mechanical structures made to enclose an electronic device, system, or circuit. These specialized parts are manufactured to not only protect the electronic components, but also to give aesthetics, and provide functionality to users.
Users will come in contact with the device indirectly through its casing. This means, that the casing to be produced must be safe for its application and should reflect its purpose. It’ll be best to design a casing to be user-friendly and shaped according to its use.
Hardware innovations are developing across all verticals, hence more and more IoT devices are developed. In these different industries, the choice of casing materials will be adjusted according to the different applications. For example, for a device to be used in the agriculture industry, it usually has to be waterproof, since plants and fields are usually watered on a regular basis. Alternately, when designing wearable devices, you should prioritize a more lightweight material, since it’s going to be used on the move.
After having your selected set of materials to be used, you'll move forward to prototype your first IoT product. (Yay!) Different materials will need different types of testing and manufacturing processes. We’ll introduce you to these few manufacturing processes.
Prototyping Method:
Explore our Knowledge Base to learn more about the mechanical processes for prototyping, including an in-depth explanation of 3D printing types and our CNC machining capabilities.
Prototyping Plastics: 3D Printers
FDM / FFF
FDM (Fused Deposition Modeling) or FFF (Fused Filament Fabrication) are used almost synonymously with 3D printing. FDM is the most popular technique of 3D printing since they are cheaper than the other methods. It’s very beginner-friendly, with numerous resources available online. FDM is open-source, with numerous communities online for community-maintained designs, such as on Thingiverse.
The process of how FDM works is as follows,
- The machine’s nozzle heats up and melts the thermoplastic (commonly FDA and ABS) filament inserted during the setup.
- The melted filament drips and deposits on the base.
- The nozzle is then moved by the motor controller following a predetermined track.
- The process is then repeated for the next layers until the 3D model is done.
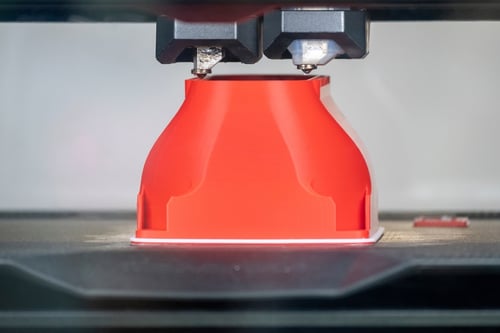 3D FDM Printing
Since 3D printing is done by depositing layer over layers of resin, any part created on top of the structure must be well supported by the structure underneath. Hence, while creating overhanging parts or bridges, temporary supporting structures are needed to prevent the part from dropping.
Once finished, the support will be removed from the part, and the part will be polished. To remove the roughness of the printed object, sandpaper with the help of water is rubbed onto the product. Your prototype will not be very aesthetically pleasing, but it should be enough for testing your product’s design and functionality. It should also be able to represent the strength and durability properties of your product’s structures.
SLA
SLA stands for stereolithography. This 3D printing technique is done using controlled UV light exposures. The SLA process serves only light-reactive thermoset liquids, not thermoplastics.
The process of SLA 3D printing is as follows:
- The light-reactive thermoset liquids (resin) are placed in the container. They are initially monomers and/or oligomers.
- A varying beam of UV light will shine towards the liquid resin, creating polymer bonds between the liquid particles.
- Remove the excess uncured resin by hand or with the help of tweezers and pliers with an isopropyl alcohol bath.
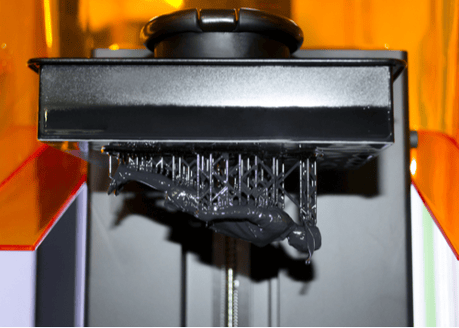 SLA Printing
The results of SLA printing are generally very smooth, so SLA is suitable for manufacturing prototypes with very tight tolerances. However, producing SLA 3D models is usually more expensive and time-consuming than FDM models. The products produced are also usually more brittle, hence it’s mostly used to view the visual aspects of your final product.
SLS
SLS (Selective Laser Sintering) is currently the fastest technique of 3D printing. It uses a high-power laser to sinter polymer powder particles together to form a solid structure. The process uses granular resin or thermoplastic polymers such as Nylon 12 which are initially heated below their melting points.
- A feeder places a thin layer of polymer powder on the printing platform.
- A laser scans the area, checks the contour, and shoots the heated beam on the printing locations to allow the powder particles to sinter (bind together).
- Once the layer is done, the feeder reapplies another layer of powder, and the procedure continues until the solid structure is finished.
- Cool down the structure for around 12 hours.
- Clean the structure using media blasting.
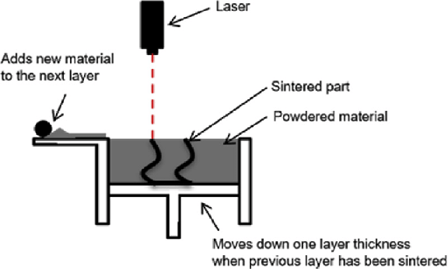 SLS Printing Process
SLS products have better and more consistent mechanical properties than when done by FDM or SLA printings. SLS is also a more environmentally friendly process since all of the unsintered grains of polymers can be reused (SLA can only recycle 50%). However, the process is not as widely used as FDM and SLS.
Prototyping Metal: CNC Machines
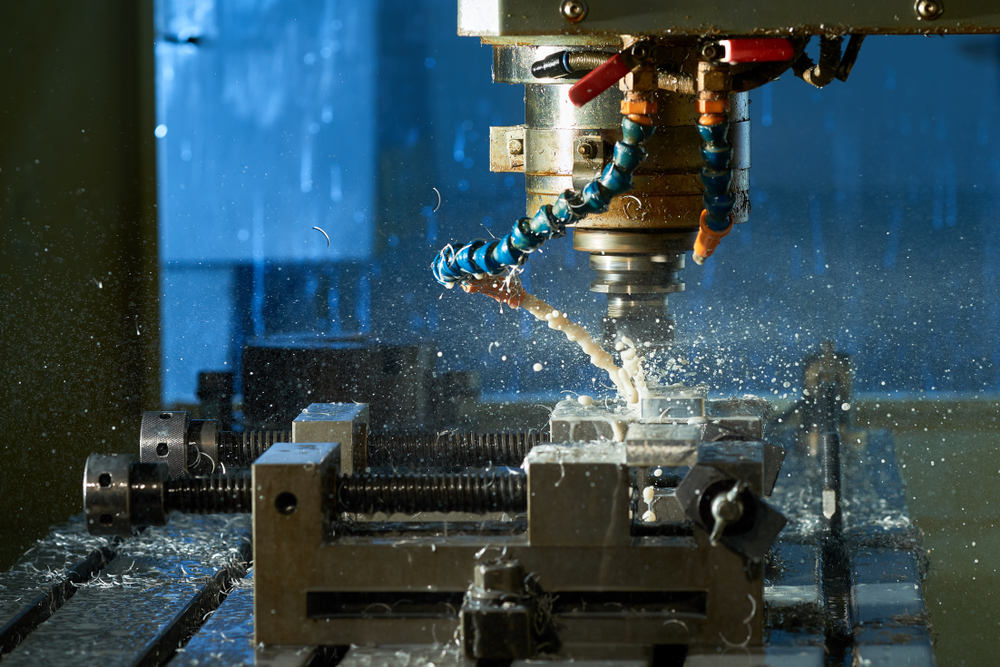
To manufacture prototypes with high accuracy, the best method is to use CNC (Computer Numerical Control) machines. CNC machines can come for different uses, from lathing, drilling, milling, and many others. These machines are computer-controlled systems that run through coordinates coded before the processing starts.
CNC machines are the best option to create prototypes from metal. You will only need to input the CAD file of your design into the system and select your choice of tool to use. The process of using CNC machine to produce prototypes in a jiffy is also known as rapid prototyping.
By using CNC machines, you can directly use the metals you need for testing. You can directly use your finished product for strength testing, durability testing, oxidative properties, and other mechanical tests. However, since you use metals and the process is a subtractive method, the cost of prototyping with CNC will typically be higher than using 3D printing. Using multi-tool CNC machines will also cost you time.
.png)
.png)
.png)
.png)